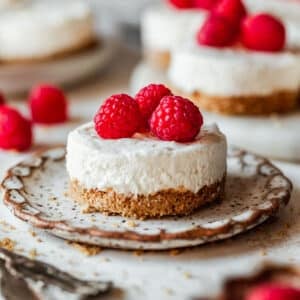
The Best No Bake Mini Cheesecakes
When you're craving cheesecake, but don't want to turn on the oven, turn to these no bake mini cheesecakes instead! With graham cracker crust and a fluffy cheesecake filling, they're quick, simple, and come together in a basic cupcake pan. They are seriously the best!
Ingredients
Graham Cracker Crust
- 16 full graham cracker sheets
- 1/3 cup granulated sugar (66 grams)
- 1/2 cup unsalted butter, melted (114 grams)
- Pinch of Kosher salt
No Bake Filling
- 1 1/2 cups heavy whipping cream, cold (360 milliliters)
- 16 ounces full-fat cream cheese, cold (454 grams)
- 1/2 cup granulated sugar (100 grams)
- 1/4 cup powdered sugar (30 grams)
- 1 teaspoon lemon zest, about 1 lemon
- 1 Tablespoon fresh lemon juice (15 milliliters)
- 1 1/2 teaspoons vanilla bean paste or 1 Tablespoon/15 milliliters vanilla extract
- 1/3 cup full-fat sour cream (80 grams)
- Berries, sauces, crushed cookies, etc. for topping (optional)
Equipment
- Mini cheesecake pan optional
- 2 standard cupcake pans with paper liners
- Food processor or rolling pin
- Stand mixer or hand mixer
Instructions
Graham Cracker Crust
- If you're using a mini cheesecake pan, spray the bottoms with a very light layer of baking spray. (If you're using standard cupcake pans, add paper liners to each cup.) Set aside.
- Break up the graham crackers and add them to the bowl of a food processor. Pulse until you have about 2 1/3 cups (240 grams) of semi-fine crumbs. Add the sugar, melted butter, and a pinch of Kosher salt. Pulse until the graham crackers are finely ground and the mixture clumps together.
- Evenly divide the graham cracker mixture into the cheesecake cups, about 2 1/2 Tablespoons per cup (or 2 Tablespoons per cupcake liner). Using a pastry tamper or clean fingers, press the mixture evenly into the bottom of the cups. Refrigerate the crusts while you prepare the filling.
No Bake Filling
- Pour the cold heavy whipping cream into a large mixing bowl. Using a hand mixer or stand mixer with a whip attachment, whip the cream into stiff peaks. Spoon the whipped cream into a bowl and set aside.
- Then, add the cold cream cheese, sugar, and powdered sugar to the same mixing bowl. Using beaters or a paddle attachment, beat the mixture until it's smooth and there are no more lumps. Scrape down the sides of the bowl, as needed.
- Add the lemon zest, lemon juice, vanilla bean paste or extract, and sour cream. Beat the filling for another 2-3 minutes on medium-high speed until the mixture is very smooth.
- Using a rubber spatula, gently fold the whipped cream into the cream cheese mixture about 1 cup at a time. Work slowly so that you don't deflate the whipped cream! Continue folding until there are no more streaks of whipped cream.
Assemble & Chill
- Using a #20 cookie scoop, divide the filling between the crusts, about 3-4 Tablespoons each. Evenly smooth the tops with a rubber spatula or butter knife. It doesn't have to be perfect!
- Cover the pan and refrigerate the cheesecakes for at least 4 hours, but preferably overnight. The longer the cheesecakes chill, the better the texture will be.
- Once the filling is set, use a butter knife to gently release the cheesecakes from the pan. Add toppings if desired and enjoy!
Notes
If you're using a mini cheesecake pan, you will end up with about 18 cheesecakes. But if you're using a cupcake pan, you'll end up with closer to 24. Feel free to use either depending on how many servings you need.
No food processor? No worries! Just place the graham crackers in a zipper bag and crush them into fine crumbs with a rolling pin.
Make sure to press the crusts firmly into the cups. If they're too loose, they will crumble apart when you remove the cheesecakes from the pan.
It's important to gently fold the whipped cream into the cream cheese. You don't want to deflate the whipped cream! It's key for that fluffy texture.
Gently push the filling into the bottoms and sides of the cups. Otherwise, you might end up with gaps in-between the filling and crusts.
Serve the cheesecakes cold. Once they get too warm, they tend to fall apart more easily.
Serving: 1mini cheesecake, Calories: 227kcal, Carbohydrates: 16g, Protein: 2g, Fat: 17g, Saturated Fat: 10g, Cholesterol: 47mg, Sodium: 128mg, Potassium: 62mg, Fiber: 0.33g, Sugar: 11g, Calcium: 40mg, Iron: 0.43mg
Did you make this recipe?Tag @sundaytable.co on Instagram!