Garlic Butter Dinner Rolls | Soft & Fluffy!
This post might have affiliate links. For full details please see my disclosure policy.
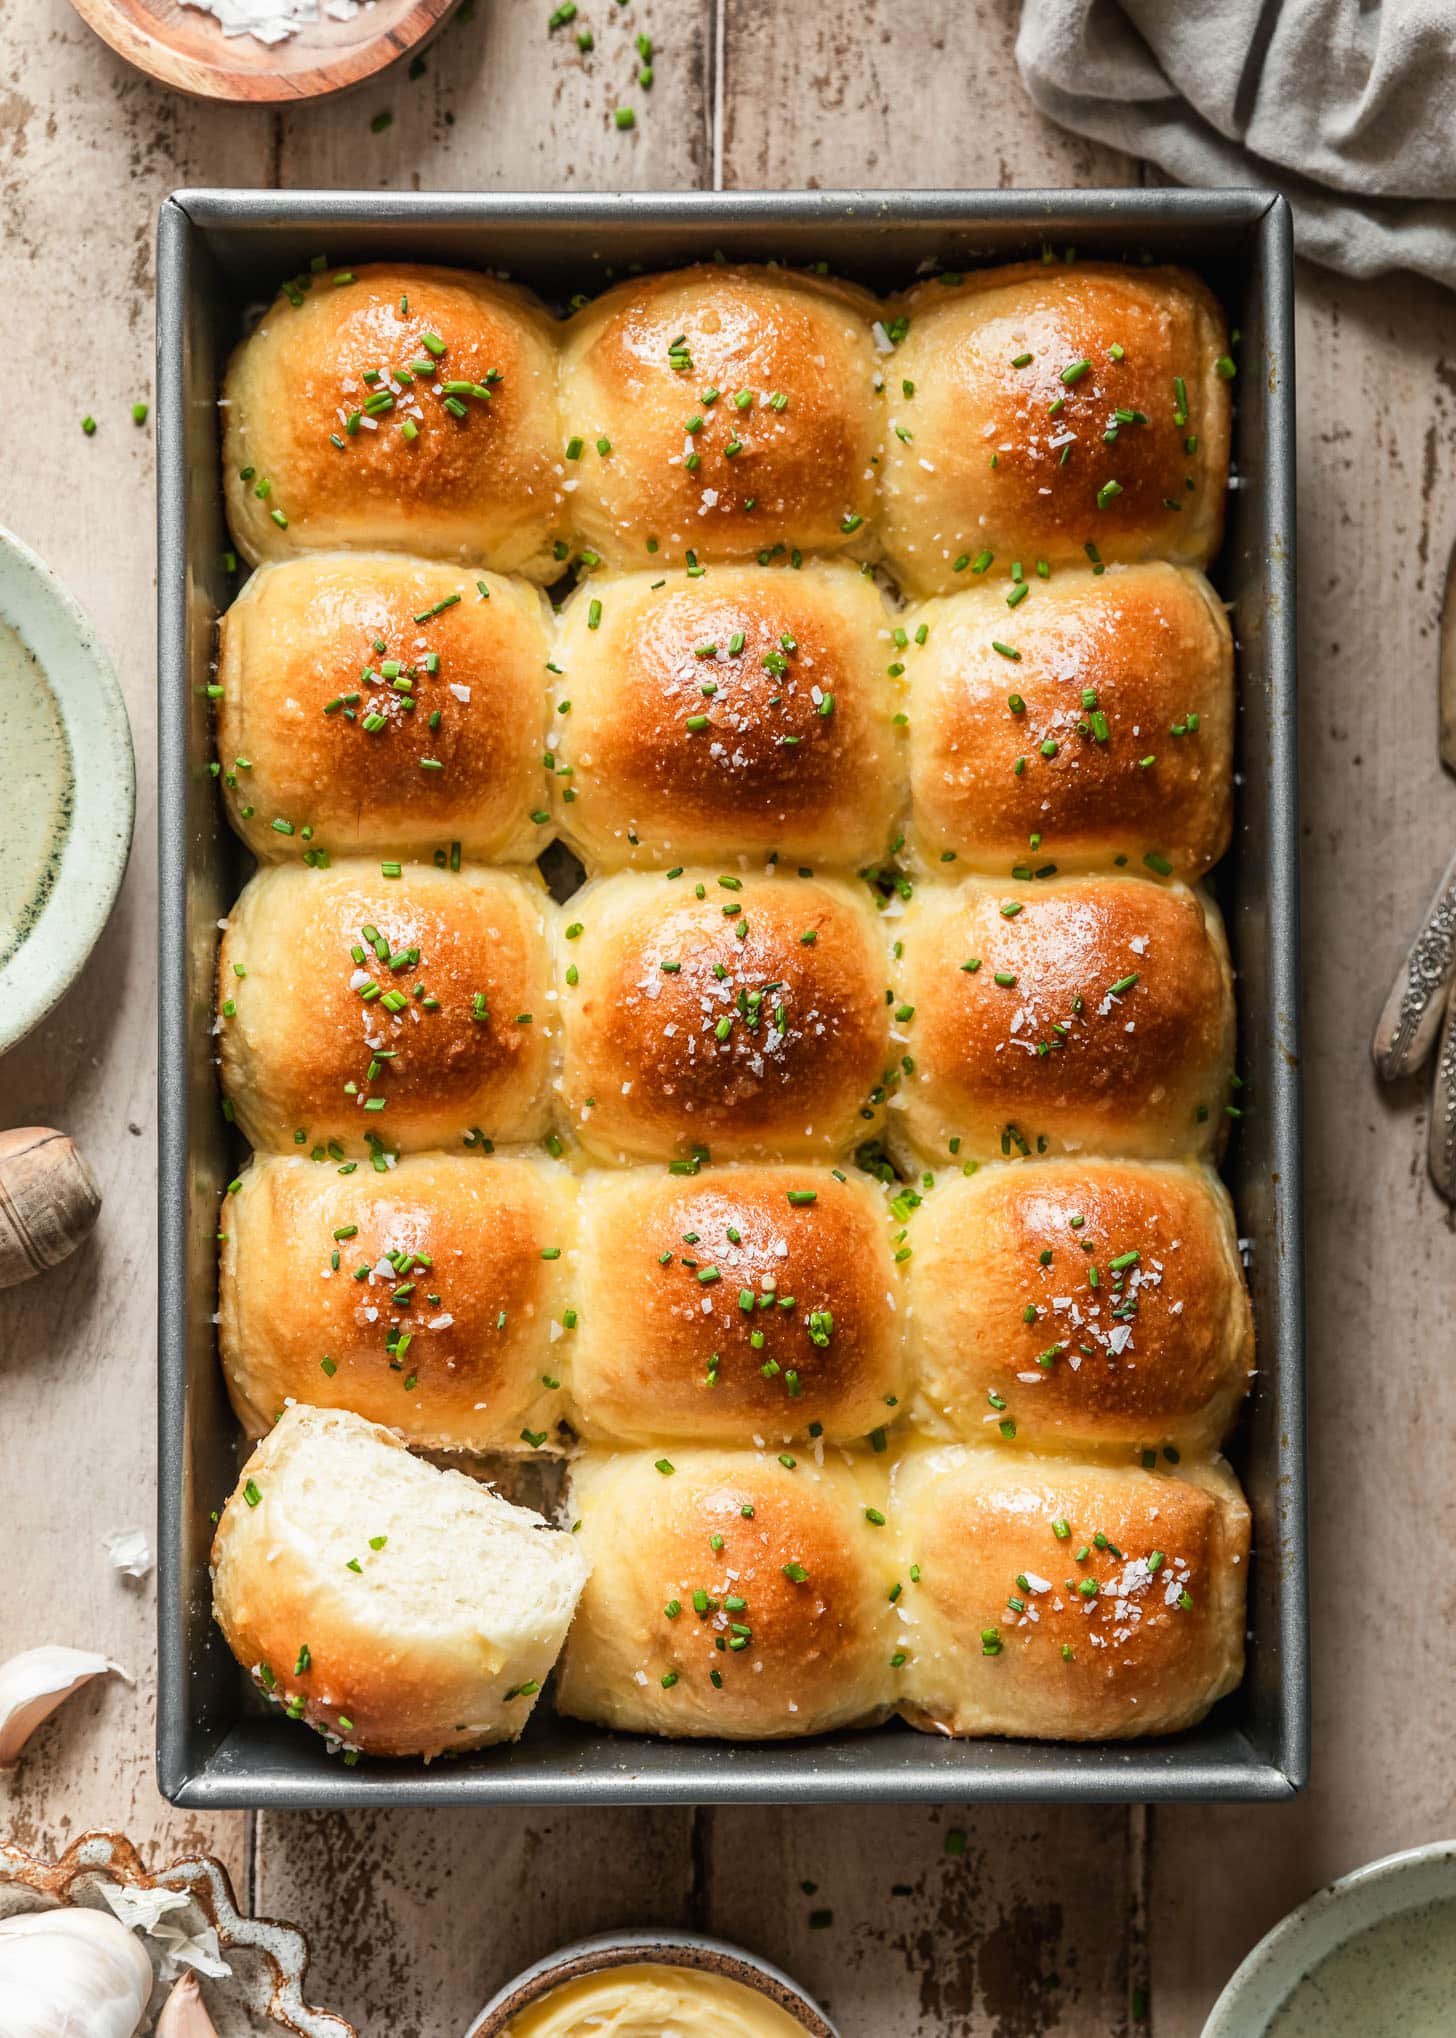
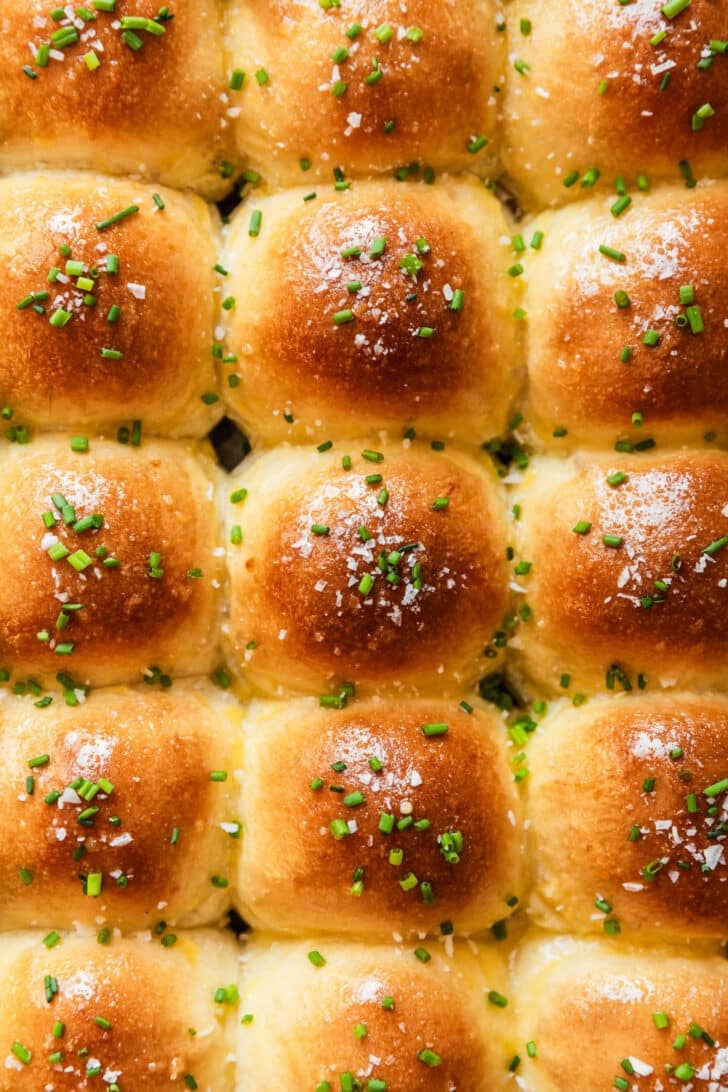
Is there anything better than homemade bread? These garlic butter dinner rolls are totally life-changing. They are soft, fluffy, buttery, and everyone is obsessed with them. Save this recipe for holidays, dinner parties, and everything in-between.
There are some recipes that are completely worth skipping the convenience of a boxed version. For me those are cheesy garlic mashed potatoes, a really good sausage cornbread stuffing, and of course, dinner rolls.
Homemade dinner rolls are just one of those things that people absolutely lose their minds over. And I’m one of them. Nothing beats homemade bread. I mean, who doesn’t love shoving a butter-slathered roll (or 5) into their face?
I spent months learning how to make bread when I was in pastry school. I’m not kidding, I must have made 10,000 dinner rolls. 😅 So let’s just say I have high standards when it comes to a good one. They should be soft, super fluffy, and have a golden, buttery top. Luckily, this recipe hits all the marks.
So if you really want to impress at holidays or dinner parties this year, make sure to tuck this recipe away for later. I promise, it’s easier than you think and it’s 1000% worth the effort of skipping the bag of grocery store rolls.
Bread flour

It’s super important to use a nice quality bread flour in this recipe! Since bread flour has more gluten than all-purpose flour, it will help the rolls rise higher and make them chewier! To make the rolls, you also need whole milk, active dry yeast, sugar, eggs, unsalted butter, and Morton’s Kosher salt. Grab some fresh garlic, garlic powder, chives, and flaky salt for the topping!
Depending on where you live, bread flour is sometimes called strong flour or baker’s flour. Essentially, it’s just flour with higher gluten (12-14%) which helps bread rise properly and makes it chewier! All-purpose flour has a gluten content around 8-11%.
How to make the dough
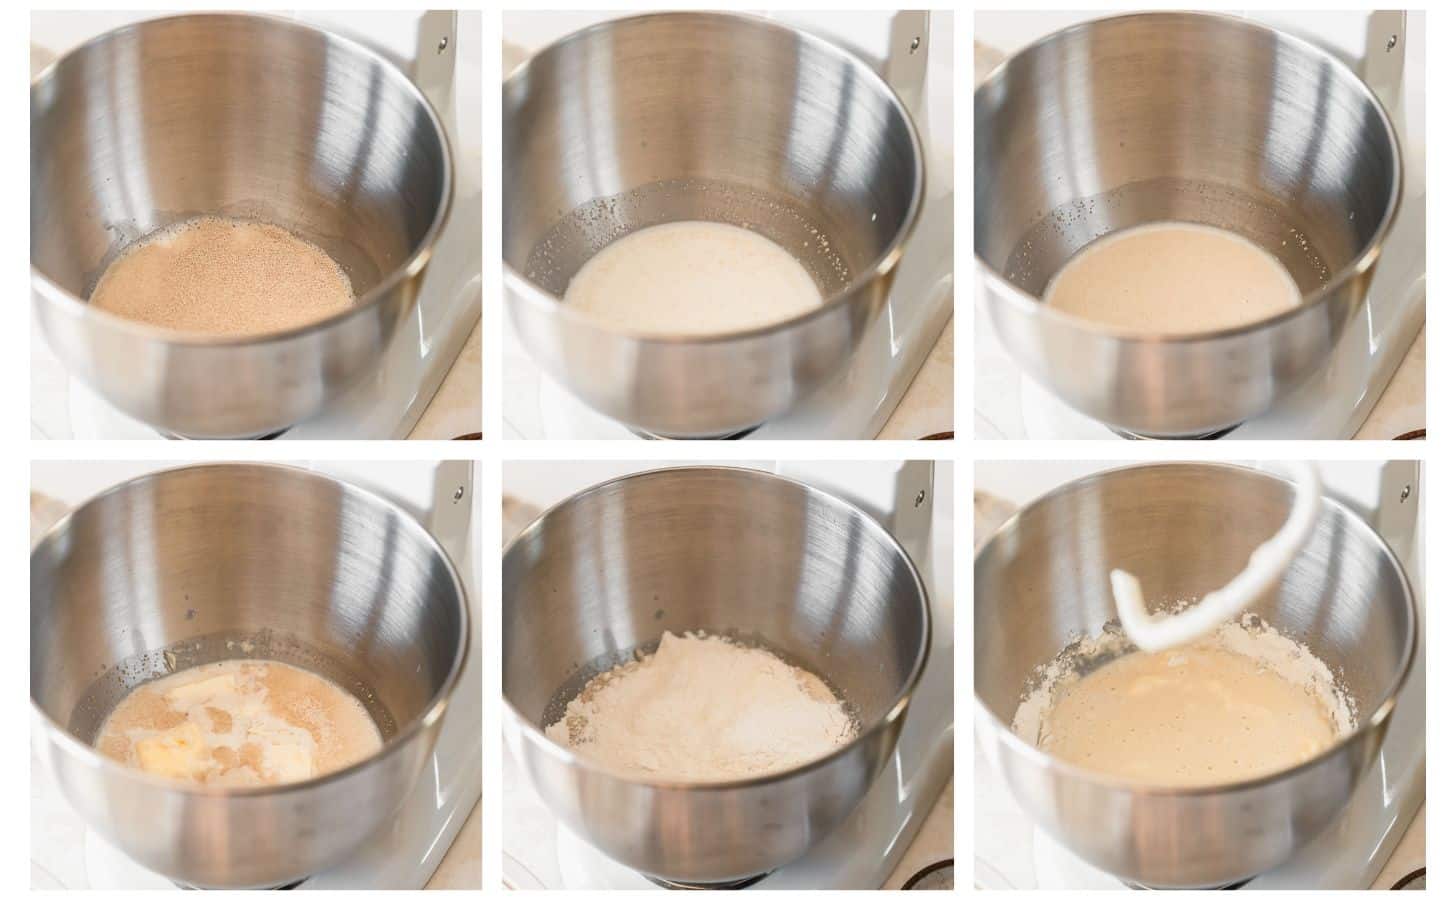
To help the yeast activate properly, make sure the milk is warmed to around 110°F (43°C). It should feel warm to the touch. If it’s too hot, it will kill the yeast. But if it’s too cold, the yeast won’t activate!

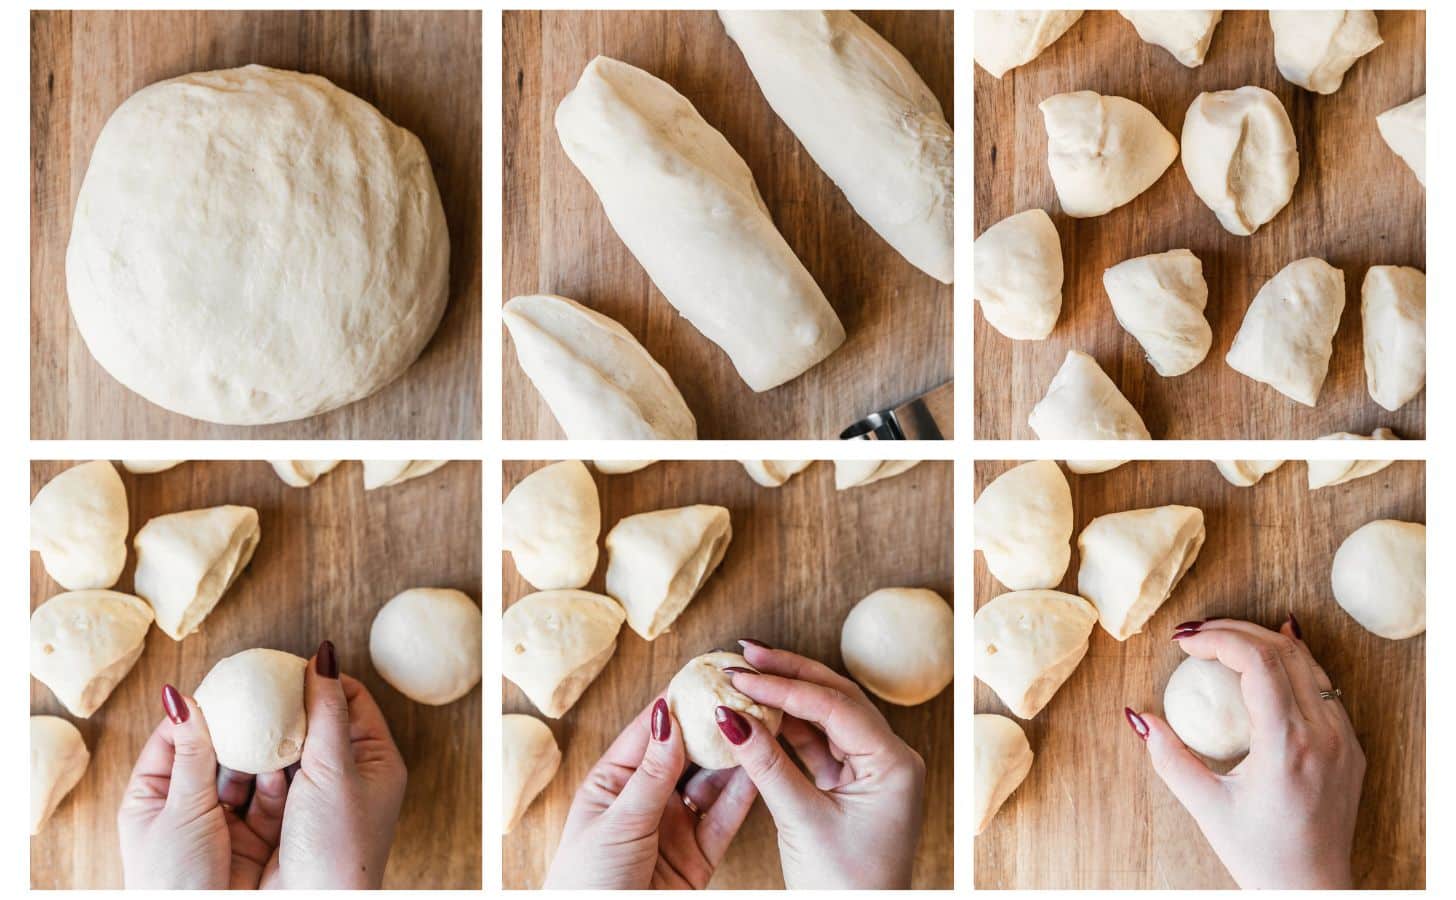
To test if the dough is properly kneaded, use the knuckle of your finger to give the dough a good poke. If it springs back slowly, it’s ready to go! If the dough springs back quickly, it needs to be kneaded for a couple more minutes. But, if the dough doesn’t fill back in, it’s over-mixed.
Shape the rolls
Don’t worry if the size of the rolls aren’t perfect – just do your best! If you do want rolls that are the same size, just weigh the dough on a scale and divide the weight by 15 or 16 (depending on how many rolls you want). Then, cut the rolls, weighing each piece to make sure they’re even. (For example, my dough came out to 915 grams, so I cut 15 rolls that were 61 grams each.)
Bake & brush with garlic butter

Turn your oven into a proof box
If your kitchen is especially drafty (or cold), here’s a quick tip for creating a proofing box using just your oven. I use this trick and it works every time!
- Turn the oven to the lowest setting (mine is 170°F or 76°C). Let it heat for about 4-5 minutes, and then turn the oven off. (Don’t worry if it doesn’t reach the set temperature. We want it to be around 100°F or 38°C.)
- Meanwhile, start boiling some water in a kettle or small saucepan. Place a heatproof pan (cake pan, baking dish, etc.) on the bottom rack of your oven.
- Once the oven reaches about 100°F and the water is boiling, place the bowl of dough on the top rack of the oven. Pour the boiling water into the pan on the bottom rack.
- Close the oven so that the mixture of heat and boiling water creates steam. After 1-2 hours, your dough should be perfectly risen!
How to store, freeze, & reheat
Place leftover rolls in an airtight container. Refrigerate the rolls for up to 3 days.
To freeze the rolls, place them on a sheet pan and freeze firm, about 1-2 hours. Then, place the frozen rolls in a freezer-safe airtight container or zipper bag. Freeze for up to 1 month. Defrost them for about 2-3 hours at room temperature before reheating.
Make-ahead rolls
These rolls are a lovely make-ahead recipe! Just make the dough, cover it tightly, and let it slow-rise in the fridge for up to 24 hours. When you’re ready to assemble the rolls, remove the dough from the fridge and let it warm up for about 1 hour, until doubled in size. Shape the rolls and finish according to the recipe directions.

I highly recommend using a kitchen scale to measure out the ingredients. This is the best way to make sure that the rolls come out soft and fluffy every time. If you don’t have a scale, measure the flour by first fluffing it with a whisk. Spoon the fluffed flour into a measuring cup and level it off without packing the flour in.
If you make this recipe, I would love it if you left a star rating and review! I read every single comment and love hearing what you think about my recipes. Thank you for supporting Sunday Table!

Easy Garlic Butter Dinner Rolls
Ingredients
Dinner Rolls
- 295 milliliters whole milk (1 1/4 cups)
- 2 1/4 teaspoons active dry yeast
- 26 grams granulated sugar, divided (2 Tablespoons)
- 2 room temperature eggs, divided
- 56 grams unsalted butter, softened & cut into cubes (1/4 cup)
- 1 1/4 teaspoons Kosher salt
- 480 grams bread flour, plus more as needed (4 cups)
- Neutral oil or unsalted butter, for greasing
Garlic Butter
- 28 grams unsalted butter, melted (2 Tablespoons)
- 1 large garlic clove, grated (3/4 teaspoon)
- 1 teaspoon garlic powder
- 1 Tablespoon chopped fresh chives
- Flaky salt, to taste
Equipment
- Stand mixer with dough hook
- 9×13 pan
Instructions
Make the dough
- Start by warming the milk in the microwave or on the stove until it's about 110°F (38°C). Pour the warmed milk into the bowl of a stand mixer. Add the active dry yeast and 1 teaspoon of sugar. Gently stir the mixture and let it sit until the yeast is foamy, about 5 minutes.
- Once the yeast is foamy, add the rest of the sugar, 1 egg, unsalted butter, salt, and 1 cup (120 grams) of bread flour. Using the dough hook attachment, stir on low until the egg is incorporated and the mixture is smooth. Using a rubber spatula, scrape down the sides of the bowl.
- Add the rest of the flour and stir on low until the dough is shaggy and pulling away from the sides of the bowl. If the dough is very wet and sticky, add flour 1 Tablespoon at a time until it is tacky and workable. (Avoid adding too much flour or the rolls will come out dense. The dough will be a bit sticky.)
- Knead the dough on medium speed until it's smooth, about 5-6 minutes. To test if the dough is properly kneaded, use your knuckle to poke the dough. If it springs back slowly, it's ready to go! If it springs back quickly, knead it for another 1-2 minutes. Or, if the dough doesn't spring back at all, it's over-mixed.
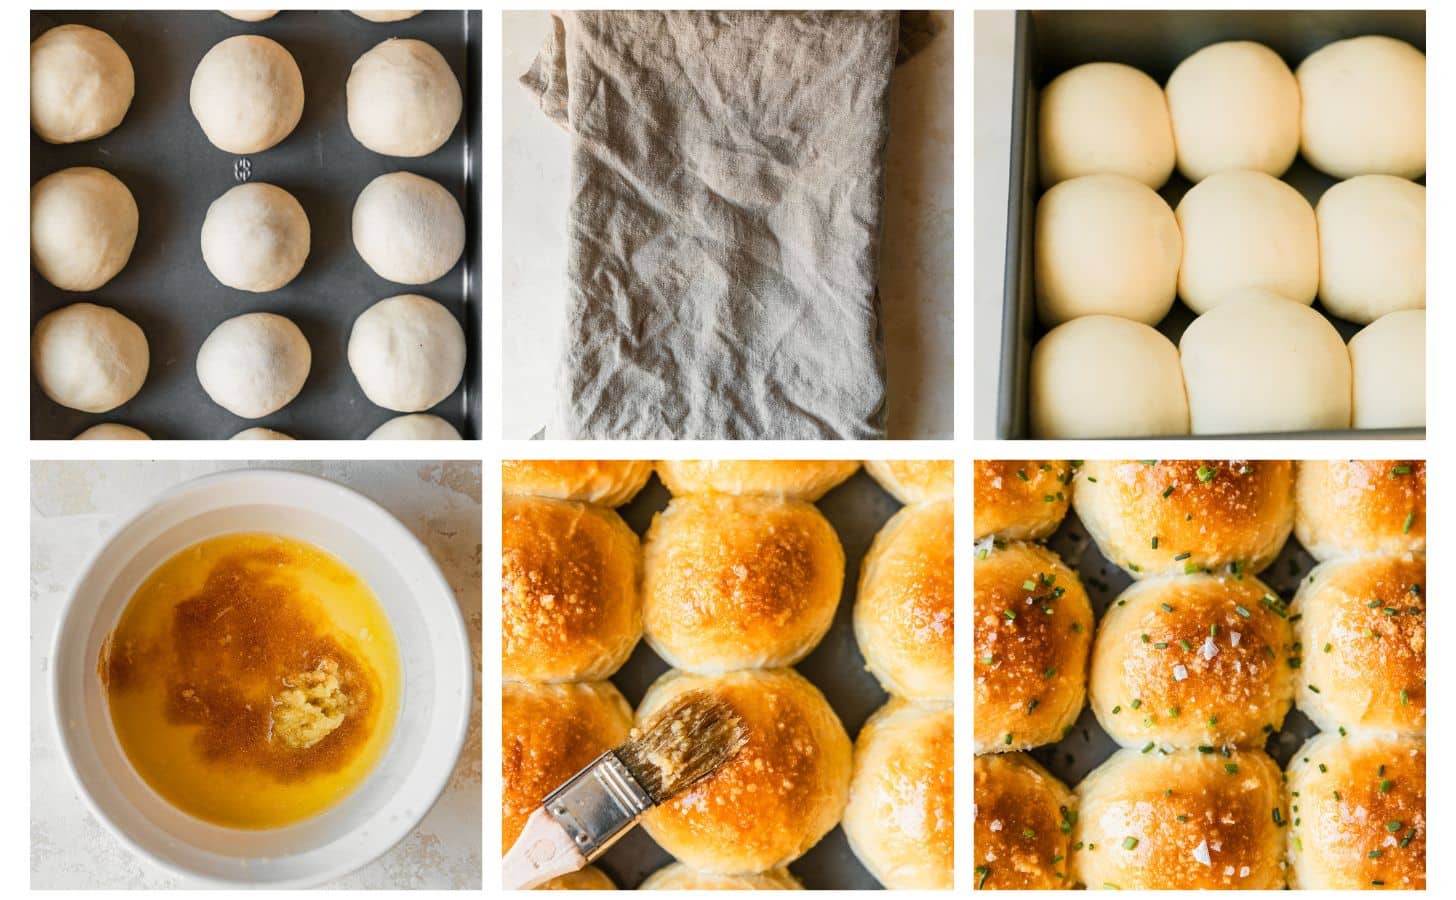
- Remove the dough and grease the bowl with neutral cooking oil. Place the dough back in the bowl, cover it with a clean linen or plastic wrap, and let it rise in a warm spot until doubled, 1 1/2-2 hours.
- Grease a 9×13 baking dish with softened butter or neutral oil. You can also use a large cast iron skillet.
Shape the rolls
- Punch down the dough and turn out on a lightly floured surface. Using a bench scraper or sharp knife, divide the dough into 15-16 equal pieces depending on how many rolls you need. (Don't worry, it doesn't have to be perfect.)
- Working one piece of dough at a time, stretch the dough out and under, tucking the ends of the dough at the bottom. Turn the dough a quarter after each stretch, shaping the dough until you have a smooth ball. Then, pinch the bottom where the ends meet to seal it well. Lastly, place the roll seam-side down. Form your hand into a C-shape, and roll the dough in a circle until the roll is round and the bottom is sealed. Repeat with the rest of the dough pieces.
- Arrange the rolls in the prepared baking dish. Cover with a clean linen or plastic wrap and rise until puffy, about 1 hour.
Bake the rolls
- Adjust an oven rack in the upper-middle section of your oven. Preheat it to 350°F (177°C). Then, whisk the remaining egg with 1 Tablespoon of water to make egg wash.
- When the rolls are ready to bake, use a pastry brush to gently brush 2 layers of egg wash on the rolls. Bake for 20-22 minutes, until the tops are golden-brown but the centers are still nice and soft. If the tops start to brown too much, tent the pan with tinfoil.
Brush with garlic butter
- While the rolls are baking, whisk the melted butter, grated garlic, and garlic powder until smooth. Brush the warm rolls with garlic butter.
- Sprinkle the rolls with the chives and flaky salt. Serve warm with salted butter. Enjoy!


Made these at Thanksgiving and they stole the show. I should’ve made a lot more.
My batch came out so golden brown and perfectly shaped. The flavor was excellent and perfect consistency.
Make extra!
Thank you, DJ! I definitely recommend doubling them, they always go quick! 🙂